2.Core settings
2.1Google Project data
Once configured as per paragraph 1.3, the Google Project data in the Core settings should never be modified.
2.2Settings
2.2.1Roles allowed to be Coworkers
As already seen in the Getting Started section, here you can configure which WordPress roles are allowed to be Service Providers (Coworkers).
Administrators are always allowed.
The non-allowed roles won't see any TeamBooking tab in their dashboards.
2.2.2Autofill reservation form fields for registered users
Depending on your WordPress membership configuration, it is possible that a registered user already provided some information in his profile, like e-mail address, first and last name, and so on.
If those fields are present in the reservation form, you can choose to pre-fill the data with the information fetched from the logged user profile, for customer's convenience.
You can also chose to pre-fill and hide those fields, so the customer is not able to modify the values.
2.2.3Load the frontend calendar at the closest month with available slots
If selected, the frontend calendar will be automatically loaded at the nearest month with at least one free slot. Please note: the first page loading can be a little bit slower.
This setting is global and it will be applied to all the calendar instances.
2.2.4Allow customers to download ICAL file after a reservation
By activating that option, a button to download an *.ICS (ICAL) file will be shown immediately after the reservation. You can also add the ICS link hook in the confirmation e-mail, so the customer can download the file from there.
2.2.5Allow service providers to use "slot commands" to override some service settings
A service provider can use certain commands to put into a Google Calendar event title to instruct the plugin to take some actions about that slot, for instance they can mark a slot as "booked". There are other commands relative to the service settings (e.g. the price) that can be used by the service providers only if you authorize that by turn this setting to "yes".
2.2.6Registration and Login URL
When a guest tries to book a member-only service, a registration button and a login button will be shown. Here you can override the default WordPress registration and login URLs.
2.2.7Redirect the customers back to the calendar page after login/registration
Choose if the customer must be redirect back to the reservation page after login/registration process (when asked by those services allowed to registered users only)
Note: an eventual login redirect plugin may interfere with that.
2.2.8Keep reservations in database for
The reservations older than this timespan (relative to the reservation's starting date) will be deleted from the database.
2.2.9Max pending time
If the payment is not made within this timeframe, the reservation will be released. It affects only the services for which the payment must be done immediately.
Note: Values too low could, in extreme cases, lead to payments after reservation is released. Furthermore, in order to process an IPN confirmation from off-site payment gateways (like PayPal), your server must be up and running. PayPal example: if your server is down, IPN will be resent by PayPal for up to four days, with a maximum of 15 retries. The interval will increase after each fail attempt.
2.2.10Google Maps API key
If you have a Google Maps API key*, put it there. This is mandatory in order to use Google Maps for installations made after 22nd of June, 2016.
*The API key must have those API libraries enabled:
-
Google Maps JavaScript API -
Google Maps Geocoding API -
Google Places API Web Service -
Google Maps Directions API(if you want the address autocomplete and the real-time directions feature)
Don't you have a Google Maps API key already? Just keep reading:
How to obtain a Google Maps API key
-
Remember the Google Project you created for the Core configuration? Well, go back to the Google API console and open it.
-
Click to
Credentialsand press theCreate credentialsbutton. Then chooseAPI key.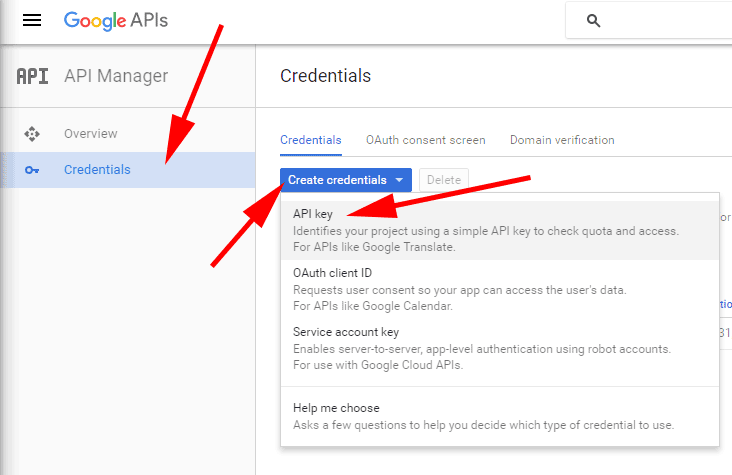
-
Click on
Browser key.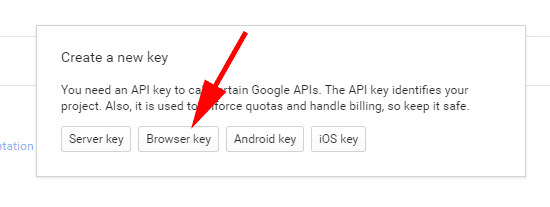
-
Choose a name for the key (e.g. "My Maps Key") in the first field, and insert the referrer in the second field.
So, if your site is http://www.mysite.com, you should insert
*.mysite.com/*.Then, press
Create.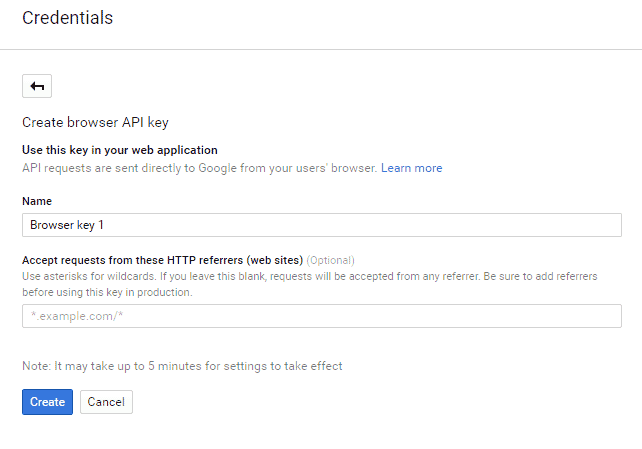
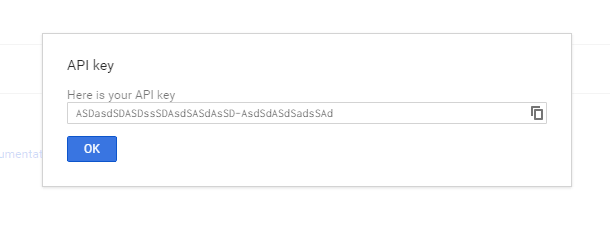
-
Copy the key and press OK.
-
Go to
Overviewand click onGoogle Maps JavaScript API.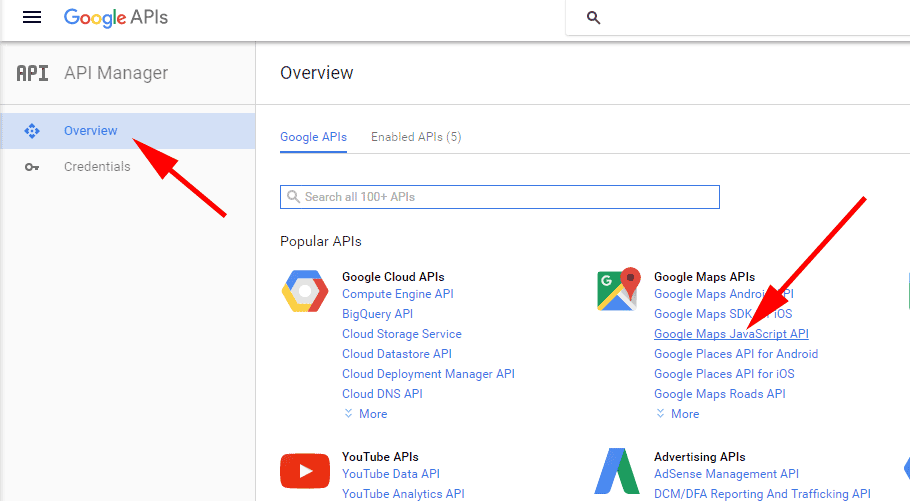
-
Press
Enable.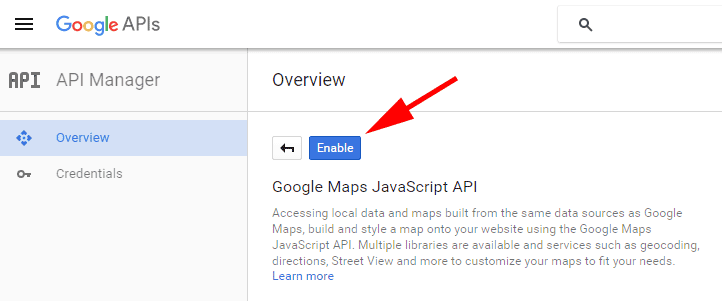
-
Repeat the last step for the
Google Maps Geocoding APIandGoogle Places API Web Servicetoo.If you need the address autocomplete and the real-time directions features, repeat the last step also for the
Google Maps Directions APItoo. -
Once the APIs are enabled, go back to TeamBooking's
Core settingsand paste in theGoogle Maps API keyfield the API key you copied before.
2.2.11Skip Google Maps library loading
Activate this option only if you know what you're doing.
If you have issues about double loading of Google Maps JavaScript library because of other maps library calls by your theme or by another plugin, you can bypass the TeamBooking's library loading.
By doing that, TeamBooking skips the Google Maps library loading, but every Google Maps eventual issue on the reservation form will be responsibility of the third-party theme/plugin which calls the Maps library first.
2.2.12Restrict continents in frontend timezone selectors
You can restrict the continents shown in the calendar's timezone selector. By default, all the continents will be shown. Uncheck the continents you want to hide.
The continents are:
- Africa
- America
- Antarctica
- Arctic
- Asia
- Atlantic
- Australia
- Europe
- Indian
- Pacific
2.3Advanced
2.3.1Import/Export of settings
You can import/export the TeamBooking settings in the relative panel.
Note: This is meant to pass the settings from one installation to another (e.g. going in production) or to restore the settings after a plugin uninstall/reinstall.
This is not meant to pass the settings between different versions of the plugin.
You do not need to do that after a plugin's upgrading.
You do not need to do that during a plugin's deactivation/reactivation.
2.3.2Repair database
If something doesn't behave as it should, especially after an update, try to hit that button. It performs a repair of the plugin's database.
2.4Cart configuration
TeamBooking has the ability to allow your customers to select multiple slots (even for different services) and to complete the booking process in a single operation. It's basically a Cart. Activating the Cart will change a little bit the frontend workflow (e.g. the reservations will grouped into orders etc.).
So if you want to activate this feature then please read carefully this paragraph. If you don't need this feature, then please skip this paragraph.
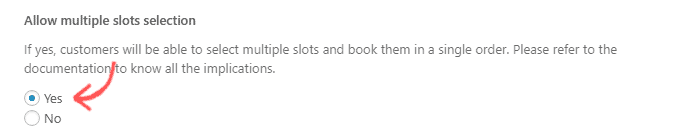
2.4.1Activating the Cart
In order to activate the Cart feature, go into the Core settings tab, locate the Allow multiple slots selection setting and set it to yes. Remember to save the settings.
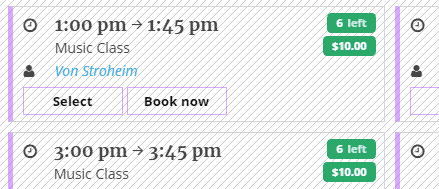
If you have some availabilities already, you will see that the frontend slots list is changed. Now each slot presents two buttons: a Select button which adds the slot to the Cart and a Book now button which allows the customer to book that slot directly (in this case the booking workflow will be the same as the one with the Cart feature deactivated).
2.4.2Cart advanced settings
In the Core Settings tab there are two important settings to fine-tune the behavior of the slots that are added in the cart:
- Block slots in cart: if set to "yes", when a customer adds a slot in the Cart, that slot will be unavailable for booking by other customers. If set to "no", the slot will stay free until the customer proceeds with the checkout.
- Slots in cart expiration time: the expiration time (since the first slot addition) of the slots in the cart. After that time, if the checkout is not yet started, the slots will be removed from the Cart. If set to "Forever" the slots will remain in the cart as long as the session cookie is valid.
Note: if the "Block slots in cart" setting is set to "yes", then please avoid to set the expiration time to "Forever", as this may result slots blocked for a very long time if a customer doesn't proceed with the checkout and doesn't empty the Cart.
2.4.3Cart frontend workflow
When a slot is added to the Cart, a Cart menu will appear above the calendar, indicating how many slots are currently in the Cart. Click on the menu to see the Cart content and to checkout (Proceed with the booking).
When the customer decides to checkout, the reservation form will appear. The booking system will show one form per service, in order to collect the correct data.
For instance, if you have "Service A" and "Service B", each one with a different reservation form, and the customer goes to the checkout with let's say 3 slots for "Service A" and 2 slots for "Service B", the booking system will show the reservation form relative to "Service A" (one time) and then the reservation form relative to "Service B" (one time).
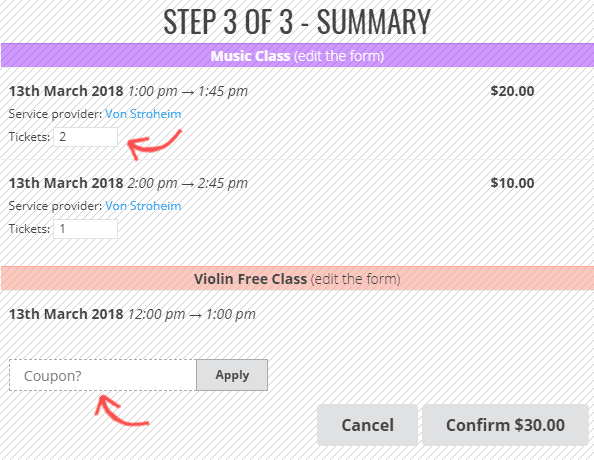
Once the data is collected, a summary step will be shown. Here the customer can perform further operations as selecting the number of tickets, adding a promo code, edit the reservation form data. Another important thing the customer can do here is about the slots relative to a service which has the payment set as "discretional": the customer can chose to pay now or later.
After the confirmation, according to the eventual payment settings and approval settings, an order id is generated and a confirmation message will be shown to the customer, with the results of the reservation process.
Note: currently, when a slot is put into the cart the system doesn't prevent it to be put into another cart. That means that any other customer is able to put that slot into their own cart and book it if they check out quicker. When that happens, the other customer will receive a notice after the checkout process.
2.4.4Cart backend workflow
What happens in the backend when a multiple slots reservation is placed?
If the order contains, let's say, 5 reservations then you will see 5 new reservations in the Overview tab. If you open the details of those reservations you will see the order id to which they refers.
There is more: the Overview tab list can be sorted by orders rather than by reservations. By doing so, a list of orders will appear. For each order you can quickly check the customer, the total/paid amounts, the date. Opening the order details will show a list of the reservations in that order, which you can conveniently export in CSV or XLSX format.
2.4.5Configuring the e-mail messages for Cart orders
By default if an order contains, let's say, 5 reservations the booking system triggers all the necessary actions 5 times. If those 5 reservations are for the same service and the confirmation e-mail message to the customer is active in that service settings, then the customer will receive 5 confirmation e-mails which will be pretty much the same with the exception of the slot inherent data (date, time, service provider).
As this can be annoying, you can configure the plugin to "group" the e-mail messages by service and then send only one e-mail per service. To achieve this go into the Core settings tab and set Batch the e-mail messages per service after a multiple slots order to yes, then save the settings. The job is not finished, though: you need to configure the services e-mail messages properly as the booking system should know which parts of the e-mail template should be repeated for each slot (so that you can have a single e-mail which resumes all the slots booked for the same services).
To know how to configure the e-mail messages properly for the "batch" operations, please refer to the E-mail configuration part of the documentation, under the Services paragraph.
2.4.6Configuring the redirect URL
TeamBooking allows you to configure a redirect URL for each service. So if customer makes a reservation for a slot of a given service, they will be redirected to the specified redirect URL, if any.
What happens for multiple slot orders? How the redirect URL is managed in that case? Well, you can obviously configure the behaviour in the Core settings tab. The Redirect URL after a multiple slots order settings can be set to:
- No redirect. When a multiple slots order is placed, there will be no redirect, regardless of what the single service redirect settings are.
- Redirect to the service redirect URL if specified and only if all the slots in the order are of the same service, otherwise do not redirect. This is pretty much self-explanatory.
- Redirect to URL. You can specify a general redirect URL to which the customers will be redirected after a multiple slots order, regardless of what the single service redirect settings are.
2.5Zoom Integration
TeamBooking integrates with Zoom so you can offer virtual meetings, conferences, sessions and so on.
To activate Zoom integration you just need to provide an API Key and an API Secret in Core Settings > Zoom meetings.
When the integration is active, the system will automatically create a Zoom meeting after a reservation for a Service for which the option to create meetings is active.
You can activate such a setting for Appointment and Event service class, under Service > Global settings > General settings.
2.5.1How to get Zoom API keys
Those are the steps to obtain API Key and API Secret from your Zoom account:
- Go to Zoom "App Marketplace"
- Log in using your Zoom account
- Select "Build App" from the "Develop" dropdown menu
- Then you need to choose the JWT option for "server-to-server integration"
- Once you fill out some basic information you will be taken to the "App Credentials" page which will give you your API key and API secret