1.Getting started
1.1Plugin installation
In your WordPress admin dashboard, go to Plugins > Add New, and click on Upload Plugin button.
Choose the team-booking.zip file to upload (the one inside the main .zip package you have downloaded from CodeCanyon), and click to Install Now
Once done, activate the plugin.
Note: TeamBooking requires a version of PHP >= 5.3 and it's tested from WordPress 4.0 to the latest version.
1.2Updating the plugin
Something's wrong after the update? Before asking for assistance, please try to go to the Core settings tab and press the Repair database button.
There are two ways to keep TeamBooking up to date.
1.2.1Automatic update notification (recommended)
After the plugin activation, you'll be asked to install the recommended Envato Market plugin (if you don't already have it). This additional plugin, when configured, handles all the updates of your installed themes/plugins from Envato.
Great, but it's my first time with Envato Market plugin... what should I do, exactly?
Once installed and activated, you will notice a new dashboard item with a leaf logo. Click on it and go to the Settings tab:
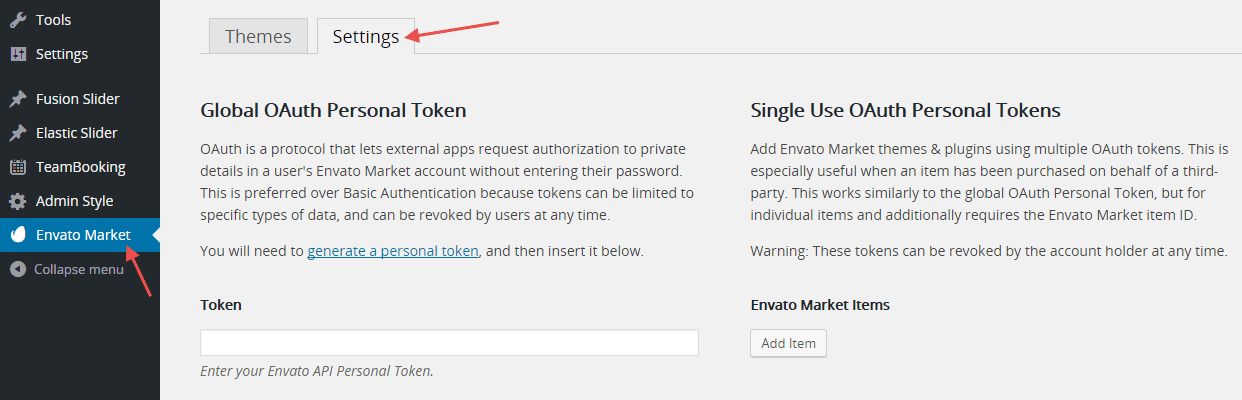
Here you can chose between Global OAuth Personal Token or Single Use OAuth Personal Token.
A Single Use personal token is the one you should use if you have purchased TeamBooking on behalf of a client. Follow the instructions, then save the changes. From now on, you'll be notified by the Envato Market plugin of any item update, which you can do with just a click.
The update process should be seamless, anyway you'd better do a backup before updating, just in case.
1.2.2Manual update, via FTP
Assuming you have just downloaded the latest plugin version from Envato, then follow those steps:
- deactivate the plugin
- replace via FTP the Team Booking plugin folder with the content of team-booking.zip file
- activate the plugin
1.3Google Project setup
In order to gain access to a Google Calendar and operate with its data, TeamBooking needs to be connected to the Google APIs. To make such connection, a Google Project has to be created. Let's see how.
-
Log into your Google Account.
A Google Account is essential to create a Google Project, but which Account it is of no importance, it can be any, either you'll use its Google Calendar to plan availability or not.
You DO NOT NEED to activate the Google Cloud trial, nor any other paid storage option!
-
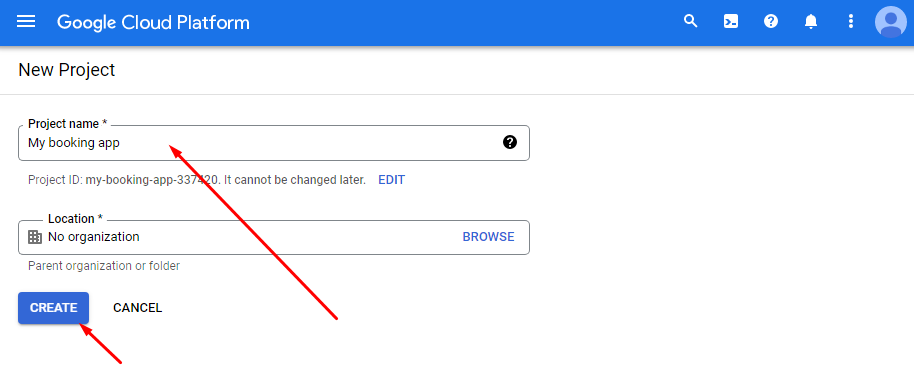
Go to the Google API Console (the link should open the page in a new tab). If a Google Cloud free trial banner appears on top, just dismiss it.
PLEASE NOTE: Google often changes the console aspect. If you find those screenshots not being updated to the current state, just drop a message to our support.
Note that "Create a project" should appear in the dropdown. Click
Continue.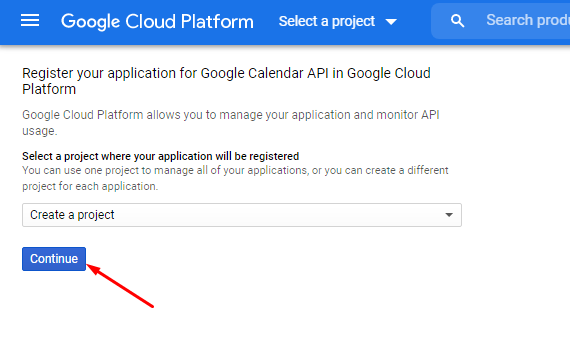
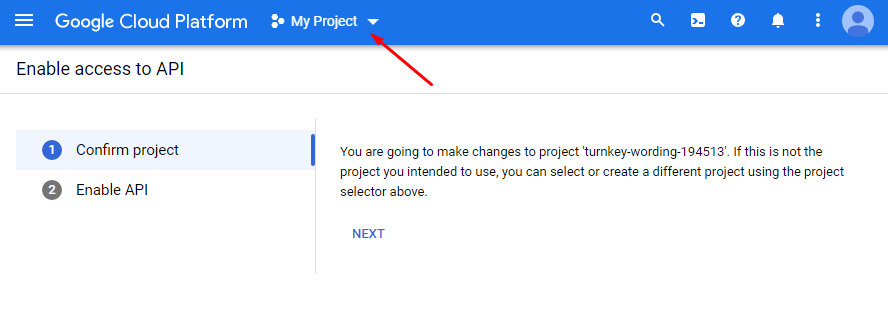
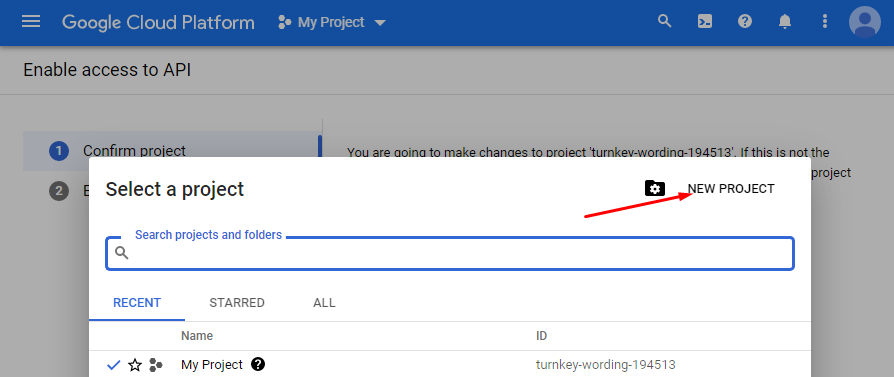
If you have other Google Projects in your Google API console, Google will automatically select one and notifies you that you are going to edit it. Don't do it, and create a new Google Project instead, as per screenshots below.
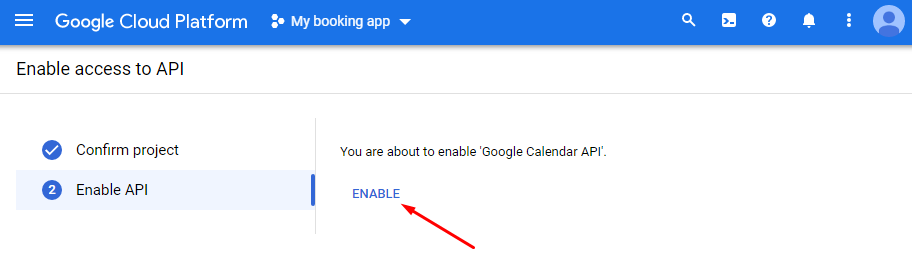
-
The Google Calendar API are enabled. Click
Go to credentials.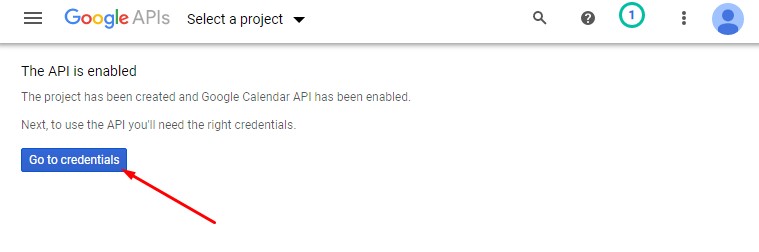
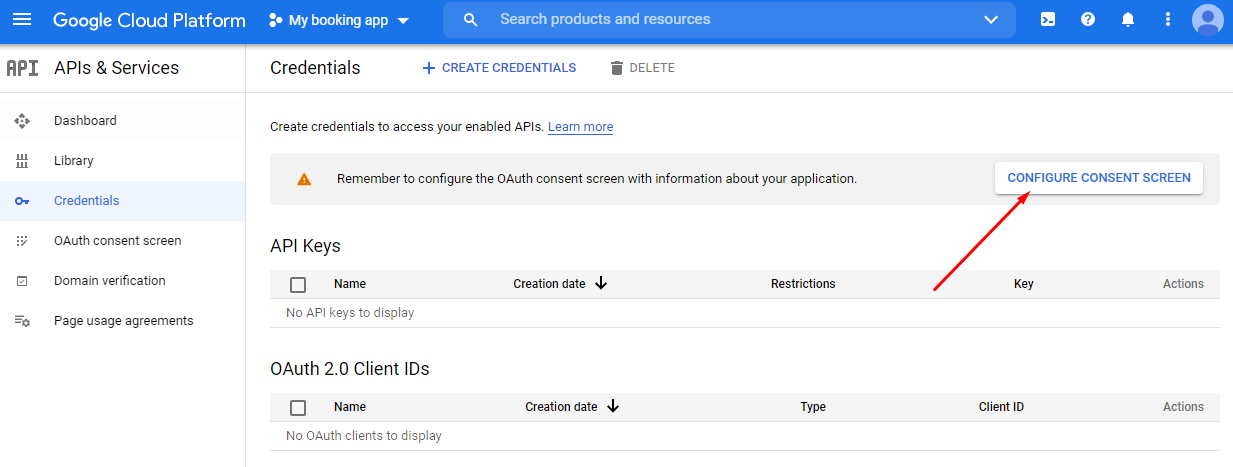
In case you don't see the
Go to credentialsbutton, navigate the menu to reach the credentials section, as illustrated in the screenshot below.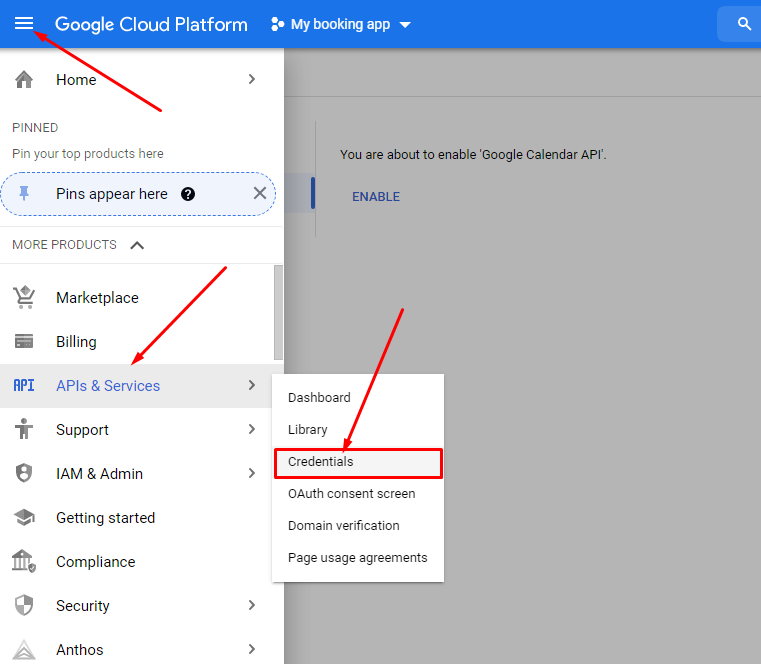
-
Now click on Configure consent screen.
Select the
Externaloption and click onCreate.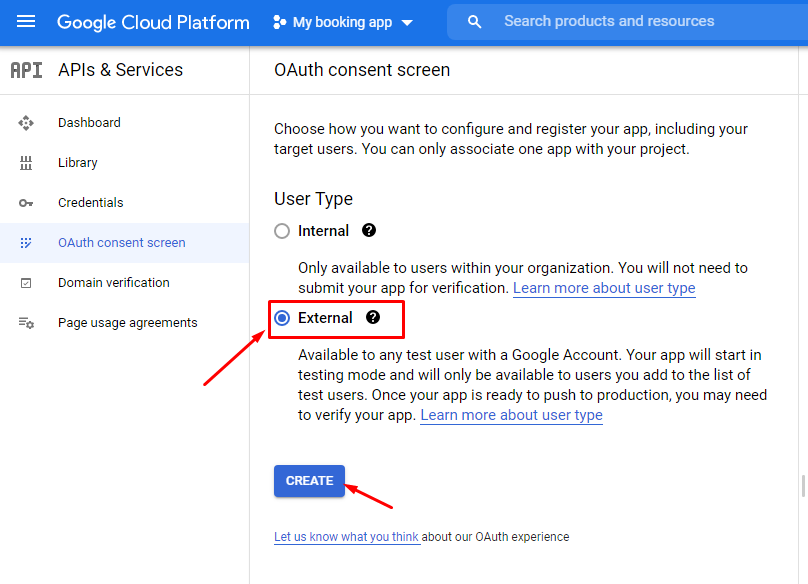
-
In the next step oAuth consent screen, choose an
App name(it can be anything, just take note of it as you have to provide it in TeamBooking later).Select the
User support emailfrom the dropdown.Under
Developer contact informationinsert your gmail address (it can be the same as User support email).Then click
Save and continue.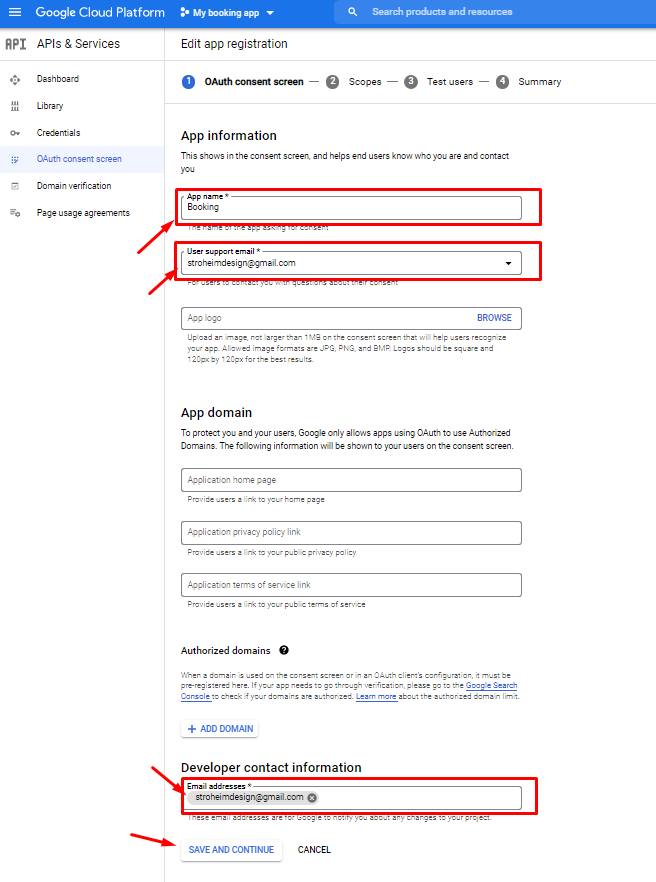
-
In the next 2 steps ("Scopes" and "Test users"), do nothing. Just hit
Save and continue.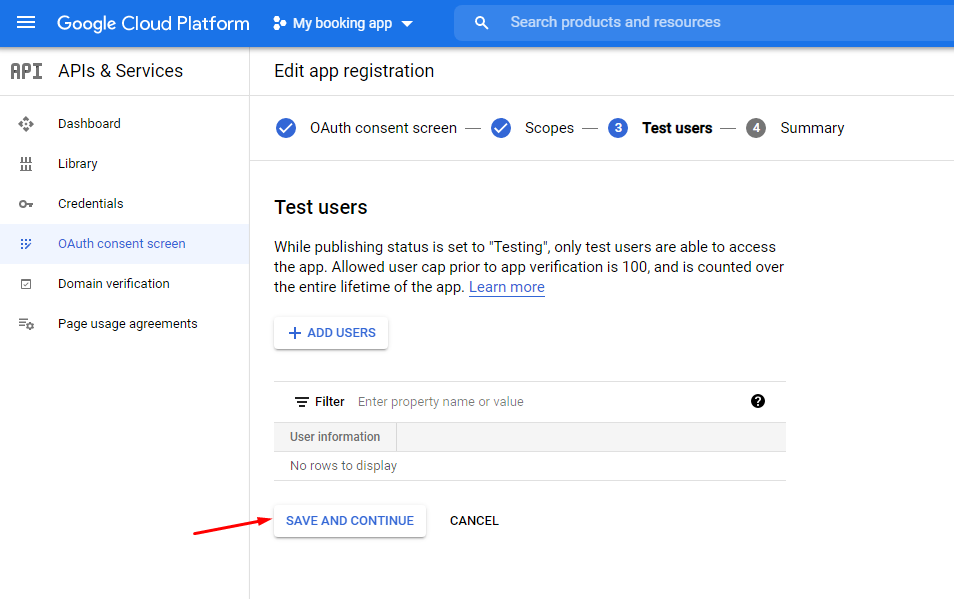
At the Summary step, hit
Back to dashboard.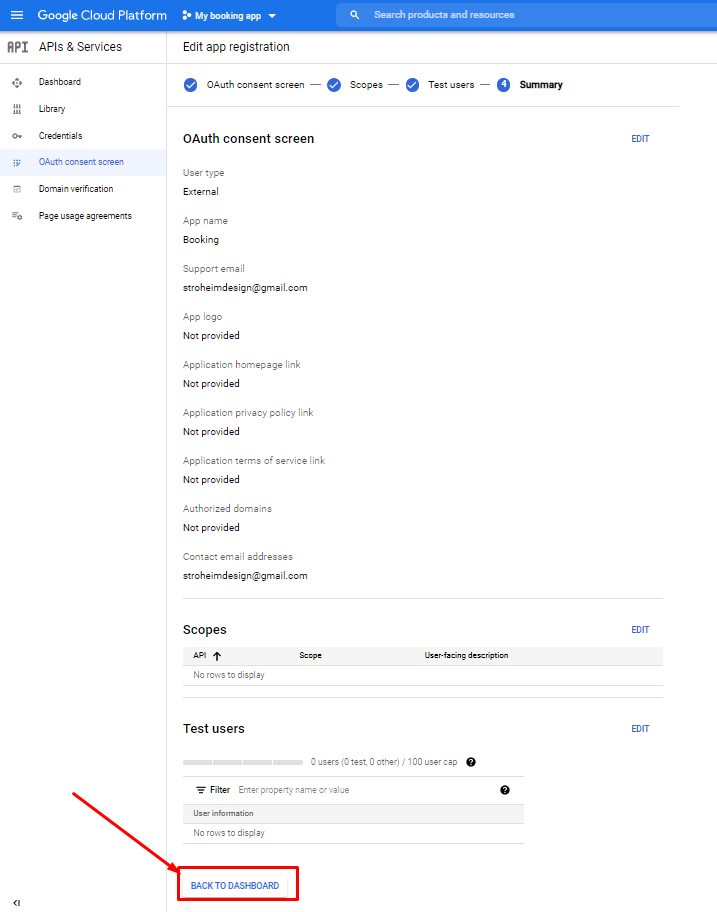
-
Now click on
Publish appand confirm.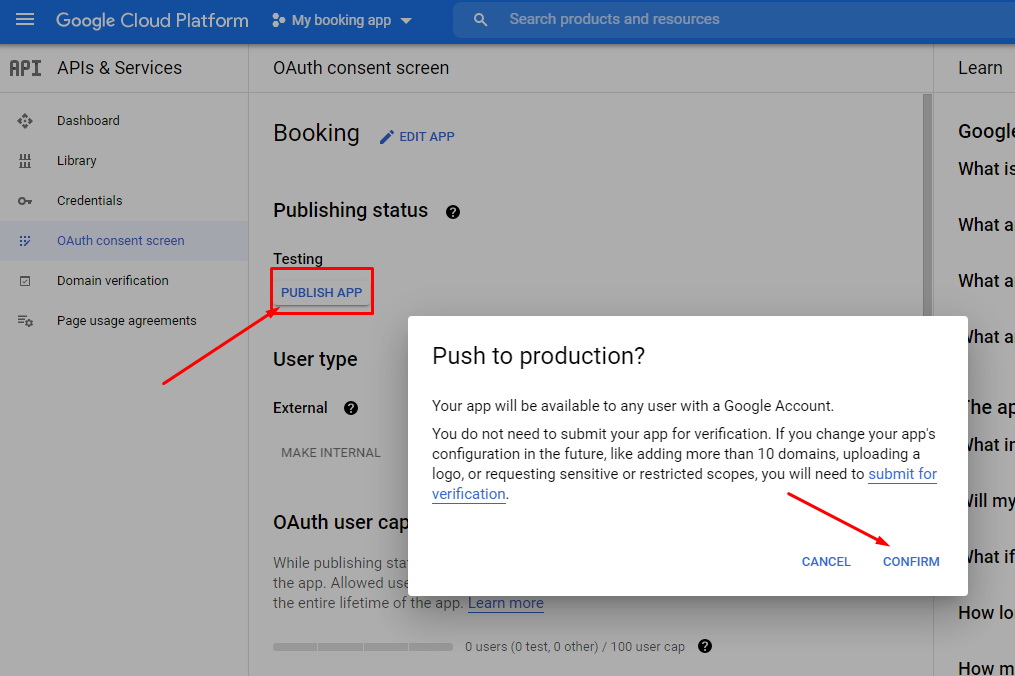
-
Back in the
Credentialssection, click onCreate credentialsand selectOAuth client IDfrom the dropdown.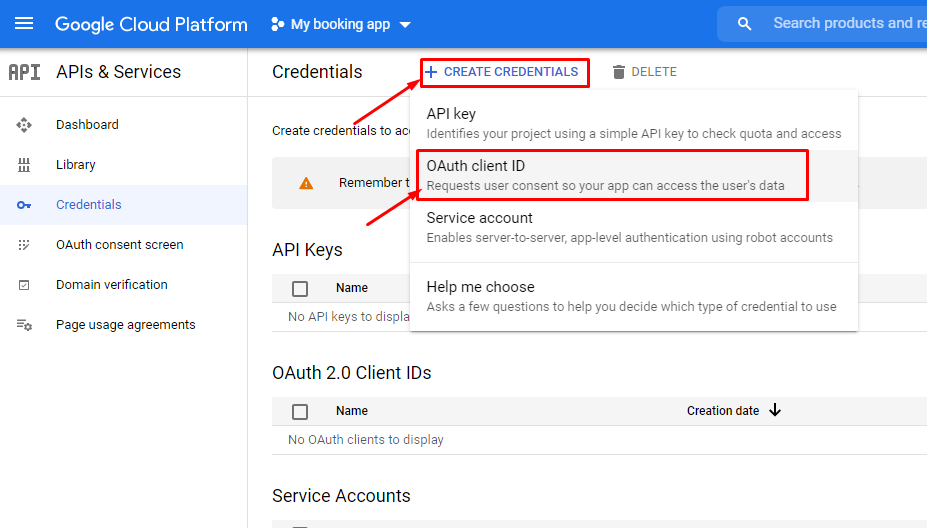
Select Web application in the dropdown. Insert the
Authorized Redirect URIand theAuthorized Javascript origins.Where you can find both? Just open another browser tab and go to the WordPress admin dashboard of your website. Go to
TeamBooking => Core Settingstab and copy the URIs from there. Ensure you are pasting them in the correct destination fields.PLEASE NOTE: Those URIs need to be "https" for security reasons. Therefore your website need to have an SSL certificate in order to use Google APIs. If the URIs that TeamBooking shows in the Core settings are of "http" type, then ask to your hosting how to activate an SSL certificate.
Finally, hit the
Createbutton.
-
Take note of the
Client IDandClient Secret.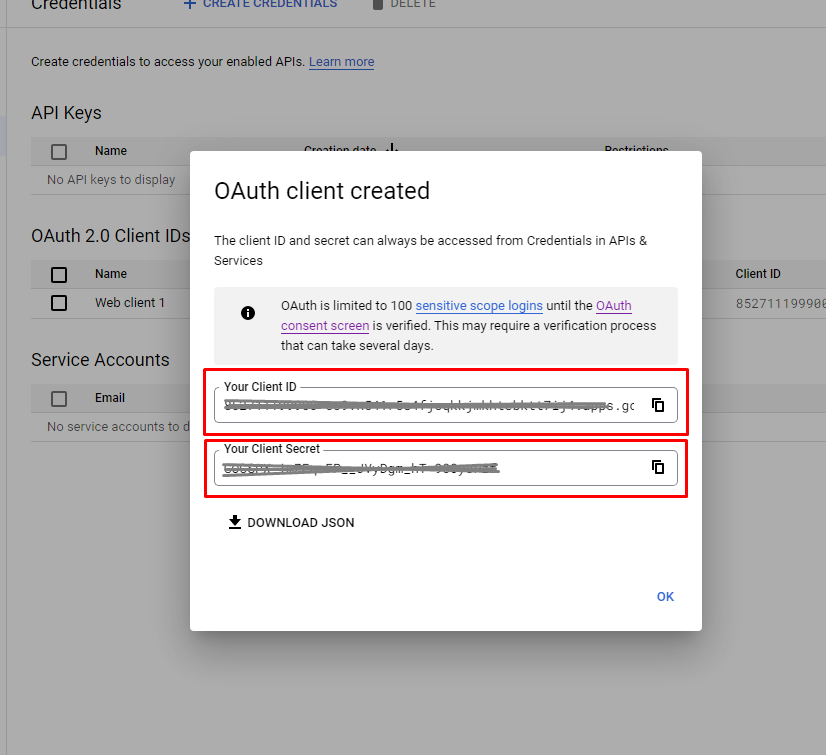
The Google Project is now successfully created and configured. If the above steps were done correctly, you should have the following 3 pieces of configuration:
- App name
- Client ID
- Client Secret
It's time to go back into the plugin dashboard to do the Core configuration.
1.4Core configuration
Go to Team Booking => Core Settings tab. Fill in the data you've got from the previous step (please note: Product name or Application name, depending on the plugin version, are the App name).
Save the changes.
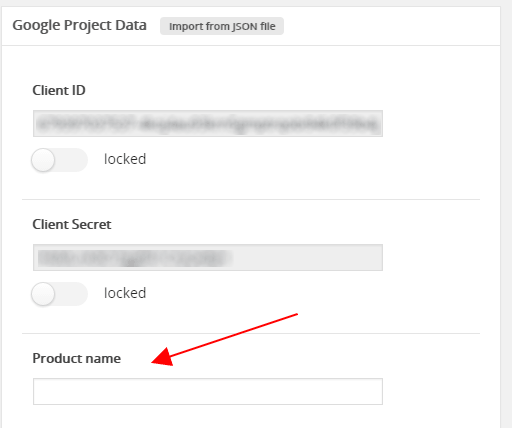
WARNING: once populated, Client ID, Client Secret and Product Name must not be changed. Doing this at some point later, will certainly cause issues with any already authorized coworker. Please keep this in mind, when you have multiple WordPress Administrators that can accidentally change those values. But if you really need to edit their values, assuming you know what you're doing, just press the lock switch, and the fields become editable.
TeamBooking is now ready to work with Google APIs. At this point you should define your business workflow.
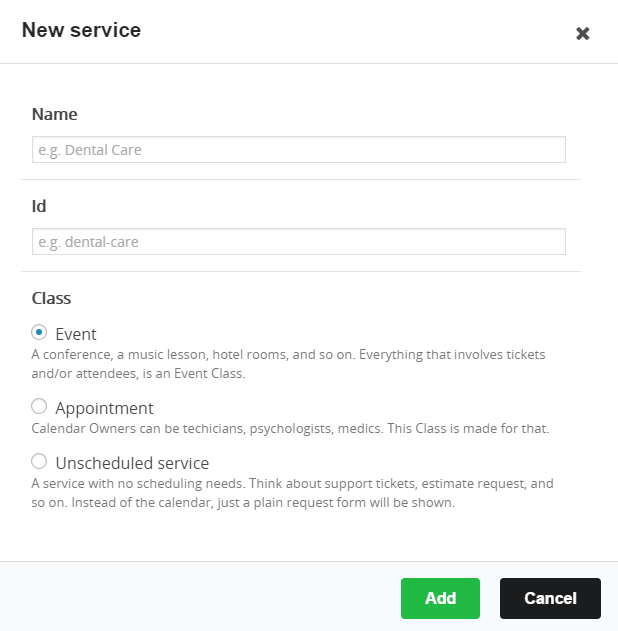
1.5Create services
What is a service? It's an event, an appointment, a conference, a class, an estimate request, a room and so on: everything you're offering to your customers that needs to be booked.
There are three classes of services:
-
Event: a conference, a collective music class, rooms... Everything that involves tickets and/or attendees.
-
Appointment: the service providers can be techicians, psychologists, medics. This Class is made for that kind of reservations, with just one customer per timeslot.
-
Unscheduled: a service with no scheduling needs. Think about support tickets, estimate request, and so on. Just a plain request form will be shown, with no calendar.
How to create a new service?
-
Go to
Team Booking => Servicestab, and press theAdd newbutton. -
Choose a good
Name(e.g. "House Survey", or "Piano Class", or "Dental Care Session"), the correctClassand anID.Note: the name and the ID must be unique, and the ID can't contain white spaces.
-
Press the
Add servicebutton. Done!
1.6Authorize the plugin
In order to make an availability plan for the services, a service provider (coworker) must give permission to TeamBooking to operate with his Google Calendar.
Depending on your business workflow, you may have just one service provider (e.g. the admin), or several service providers (e.g. the admin and a team of coworkers).
Since the authorization process is something that happens between TeamBooking (or rather the Google Project behind it) and the Google Account of the service provider, it's important to understand that a service provider must go through the following authorization steps while logged in his own Google Account.Note: If you are working with a team of service providers (coworkers), this step must be done by each of them.
How can I (or any other service provider) give this authorization?
In order to give the authorization, go to the Personal settings tab in your TeamBooking dashboard. Press the Authorize button.

If you are not logged into your Google Account already, a Google Login prompt will appear, and you are invited to login.
Note: During this process Google might warn you that the App isn't verified. Just skip this advice by clicking on Advanced (at the lower-right corner) and continue.
After the login (or if you are already logged in), Google asks you to confirm the authorization. Make sure that the checkbox to allow Google Calendar permissions is checked. Then confirm.
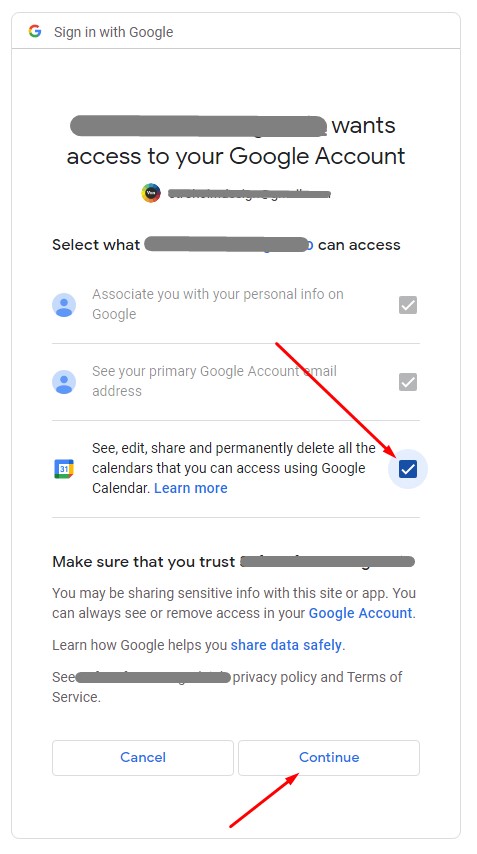
After confirmation, you are redirected back to your Personal settings tab, where you can see that your Google Account is now authorized.
TeamBooking is now able to interact with your Google Account. Just one thing is left: choose one or more Google Calendars from your account.
1.7Select your Google Calendar(s)
Once a service provider (coworker) gave the authorization, TeamBooking is able to interact with his Google Account. After that, he must choose the Google Calendar(s) he want to use (as you may already know, a Google Account can have unlimited Google Calendars).
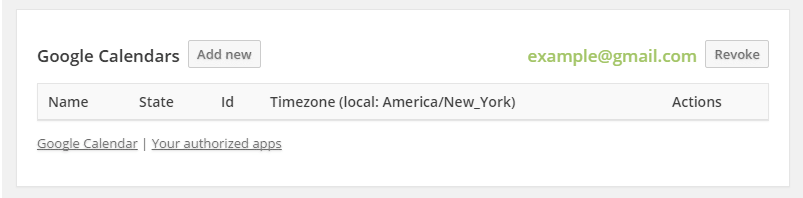
Go to Team Booking => Personal Settings tab, and press the Add new button.

A modal will appear. Here you can select one of your Google Calendars.
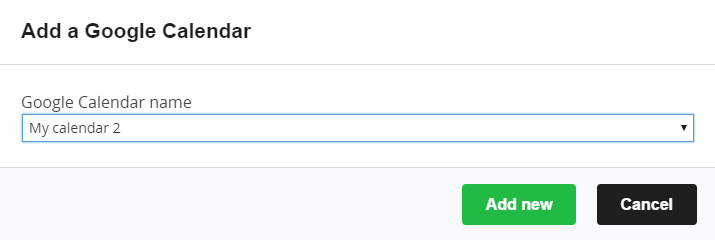
Add it, and a new row in the table appears with your calendar properties. It's very important to ensure that the status is synced. Otherwise, just press the Sync button under actions to perform a manual sync request.
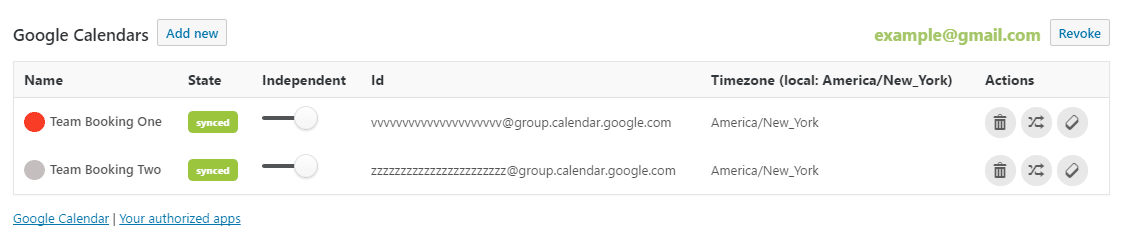
You can also check the Google Calendar's timezone and compare it to the local WordPress timezone. The plugin's frontend calendar always transpose all the times to the local timezone by default, unless the customer changes the displayed timezone.
You can add multiple Google Calendars, if you need to. Just repeat the step.
At this point, Team Booking knows from which of your Google Calendars the data must be fetched.
1.7.1Google Calendar's interdependency
Note: the following is useful only if you have added more than one Google Calendar
By default, a calendar is set to independent. That means that events on it can't affect (and can't be affected by) the events that reside in all the other added Google Calendars.
Viceversa, if you de-select the independent status of a calendar, the events on it will affect (and will be affected by) the events that reside in all the other non-independent Google Calendars. This is particularly interesting, just as example, when you are used to keep your personal events in a separate Google Calendar but still want those events to block the services availabilities when they overlaps (see the Personal availability settings paragraph for more details about overlapping features).
1.7.2Keep them clean
The Delete past events button offers an interesting feature: you can keep your Google Calendar clean (and the database lighter and faster) by deleting the past events on it (going backwards from the last week as a security buffer). The eventual reservation records in the database won't be deleted. Please note: all kind of events will be deleted, not only those related to TeamBooking.
1.8Let's go
If you have followed all the previous steps, now the plugin is ready to work. You, or your service providers (coworkers) should now begin to plan availabilities and fine-tune the settings. In order to learn how, please read the dedicated chapters of this documentation.
The next chapters are about configurations, settings and so on, so you can trim all the aspects in order to suit your needs.
Enjoy!